Except as otherwise noted, the content of this page is licensed under the Creative Commons Attribution 3.0 License, and code samples are licensed under the BSD License.
©2012 Google
This page describes how to package your extension.
As the Overview explains,
extensions are packaged as signed ZIP files
with the file extension "crx"—for example,
myextension.crx.
Note:
You do not need to package your own extension.
If you publish your extension using the
Chrome Developer Dashboard,
then the only reason to create your own .crx file
would be to distribute a non-public version—for example,
to alpha testers.
You can find information on publishing extensions and apps in the
Chrome Web Store getting started tutorial, starting at
Step 5: Zip up your app.
When you package an extension, the extension is assigned a unique key pair. The extension's ID is based on a hash of the public key. The private key is used to sign each version of the extension and must be secured from public access. Be careful not to include your private key within your extensions!
To package an extension:
chrome://extensions
c:\myext.
(Ignore the other field;
you don't specify a private key file
the first time you package a particular extension.)
.crx file,
which is the actual extension that can be installed,
and a .pem file,
which contains the private key.
Do not lose the private key!
Keep the .pem file secret and in a safe place.
You'll need it later if you want to do any of the following:
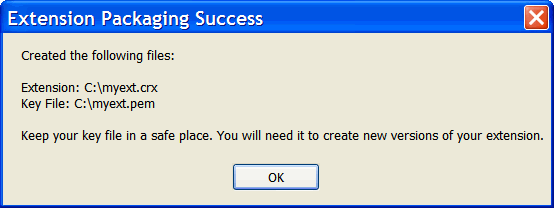
If the extension is successfully packaged, you'll see a dialog like this
that tells you where to find
the .crx and .pem files:
To create an updated version of your extension:
manifest.json.
c:\myext.
.pem file for this extension—for
example, c:\myext.pem.
If the updated extension is successfully packaged, you'll see a dialog like this:

You can use the Chrome Developer Dashboard to upload an extension that you've previously packaged yourself. However, unless you take special steps, the extension's ID in the Chrome Web Store will be different from its ID in the package you created. This different ID might be a problem if you've distributed your extension package, because it allows users to install multiple versions of your extension, each with its own local data.
If you want to keep the extension ID the same, follow these steps:
.crx file to key.pem. key.pem in the top directory
of your extension.
Another way to package extensions
is by invoking chrome.exe at the command line.
Use the --pack-extension flag
to specify the location of the extension's folder.
Use --pack-extension-key
to specify the location of the extension's private key file.
For example:
chrome.exe --pack-extension=c:\myext --pack-extension-key=c:\myext.pem
For more information on the format, as well as pointers to scripts you can use
to create .crx files, see CRX Package Format.